Mount Temple Scrambler’s Guide
Banff National Park
Mount Temple is the prominent triangular-shaped peak capped with ice and snow that towers above the village of Lake Louise. While there are technical routes up the main face, a moderate scramble is hidden from view on the southwest side of the mountain.
Mount Temple is popular because it is one of the highest peaks in the Lake Louise area and number of accidents have occurred here in the past. See the detailed route information and important safety tips.
Important! Mount Temple is a summer climb.
Route conditions are best after the winter snow has melted completely off the peak, usually by mid-July. Unfortunately, the route can only be viewed from Larch Valley. For comparison, consider how much snow remains on neighbouring high-elevation peaks; otherwise, contact or visit a Banff, Lake Louise or Field Parks Canada visitor centre to check on route conditions.Special Climbing and Safety Tips
Human-triggered rockfall is one of the leading causes of accidents on this route. To minimize exposure to this hazard:
- Travel in a cluster with other scramblers so any dislodged rocks do not gather speed and hit people below, or wait until other parties are no longer directly below/above you.
- Travel more slowly on the descent to avoid causing rockfall.
- Tell others if there are people below so everyone can be extra diligent and not cause rockfall.
- If a rock is dislodged, yell “Rock!” so people below move out of the way.
- Protect yourself:
- Plan for short rests behind rock bluffs or faces, and longer rests near the ridge.
- Cross gullies quickly and avoid travelling any distance in them.
- Wear a helmet! (Available to rent locally).
Trailhead
Attention!
Parking is very limited at Moraine Lake. Parks Canada shuttles are available during the summer. 
Route Description
This route description is aimed at strong hikers and scramblers. Mount Temple is not a good choice for a first-time scramble ascent.
Summit: 3 543 m (11 621 ft.)
Elevation gain of climb: 1 690 m (5 543 ft.)
Distance: approx. 16 km round trip
Average round-trip time: 7-12 hours
Rockfall
Most of the climb is a steep, strenuous hike on loose scree or worn, intermittent footpaths. Careful routefinding minimizes exposure to mountain hazards (rockfall, cornices, etc.) and leads through weaknesses in three cliff bands that require scrambling up short steps of rock, using hands as needed for balance or climbing. Cairns along the route help as a guide, but not all cairns mark the safest ascent/descent line. Route-finding decisions are required. Crampons and an ice axe are likely required if the summit is snow-covered. Human-triggered rockfall is one of the leading causes of accidents on this route—see “Special Climbing and Safety Tips”. Wear a helmet (available to rent locally).Restricted Access and Bears
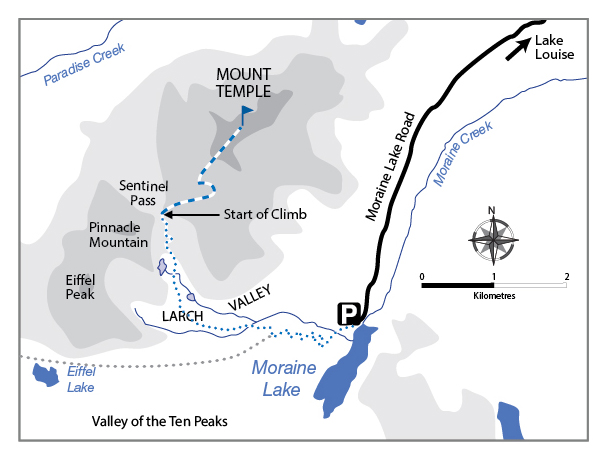
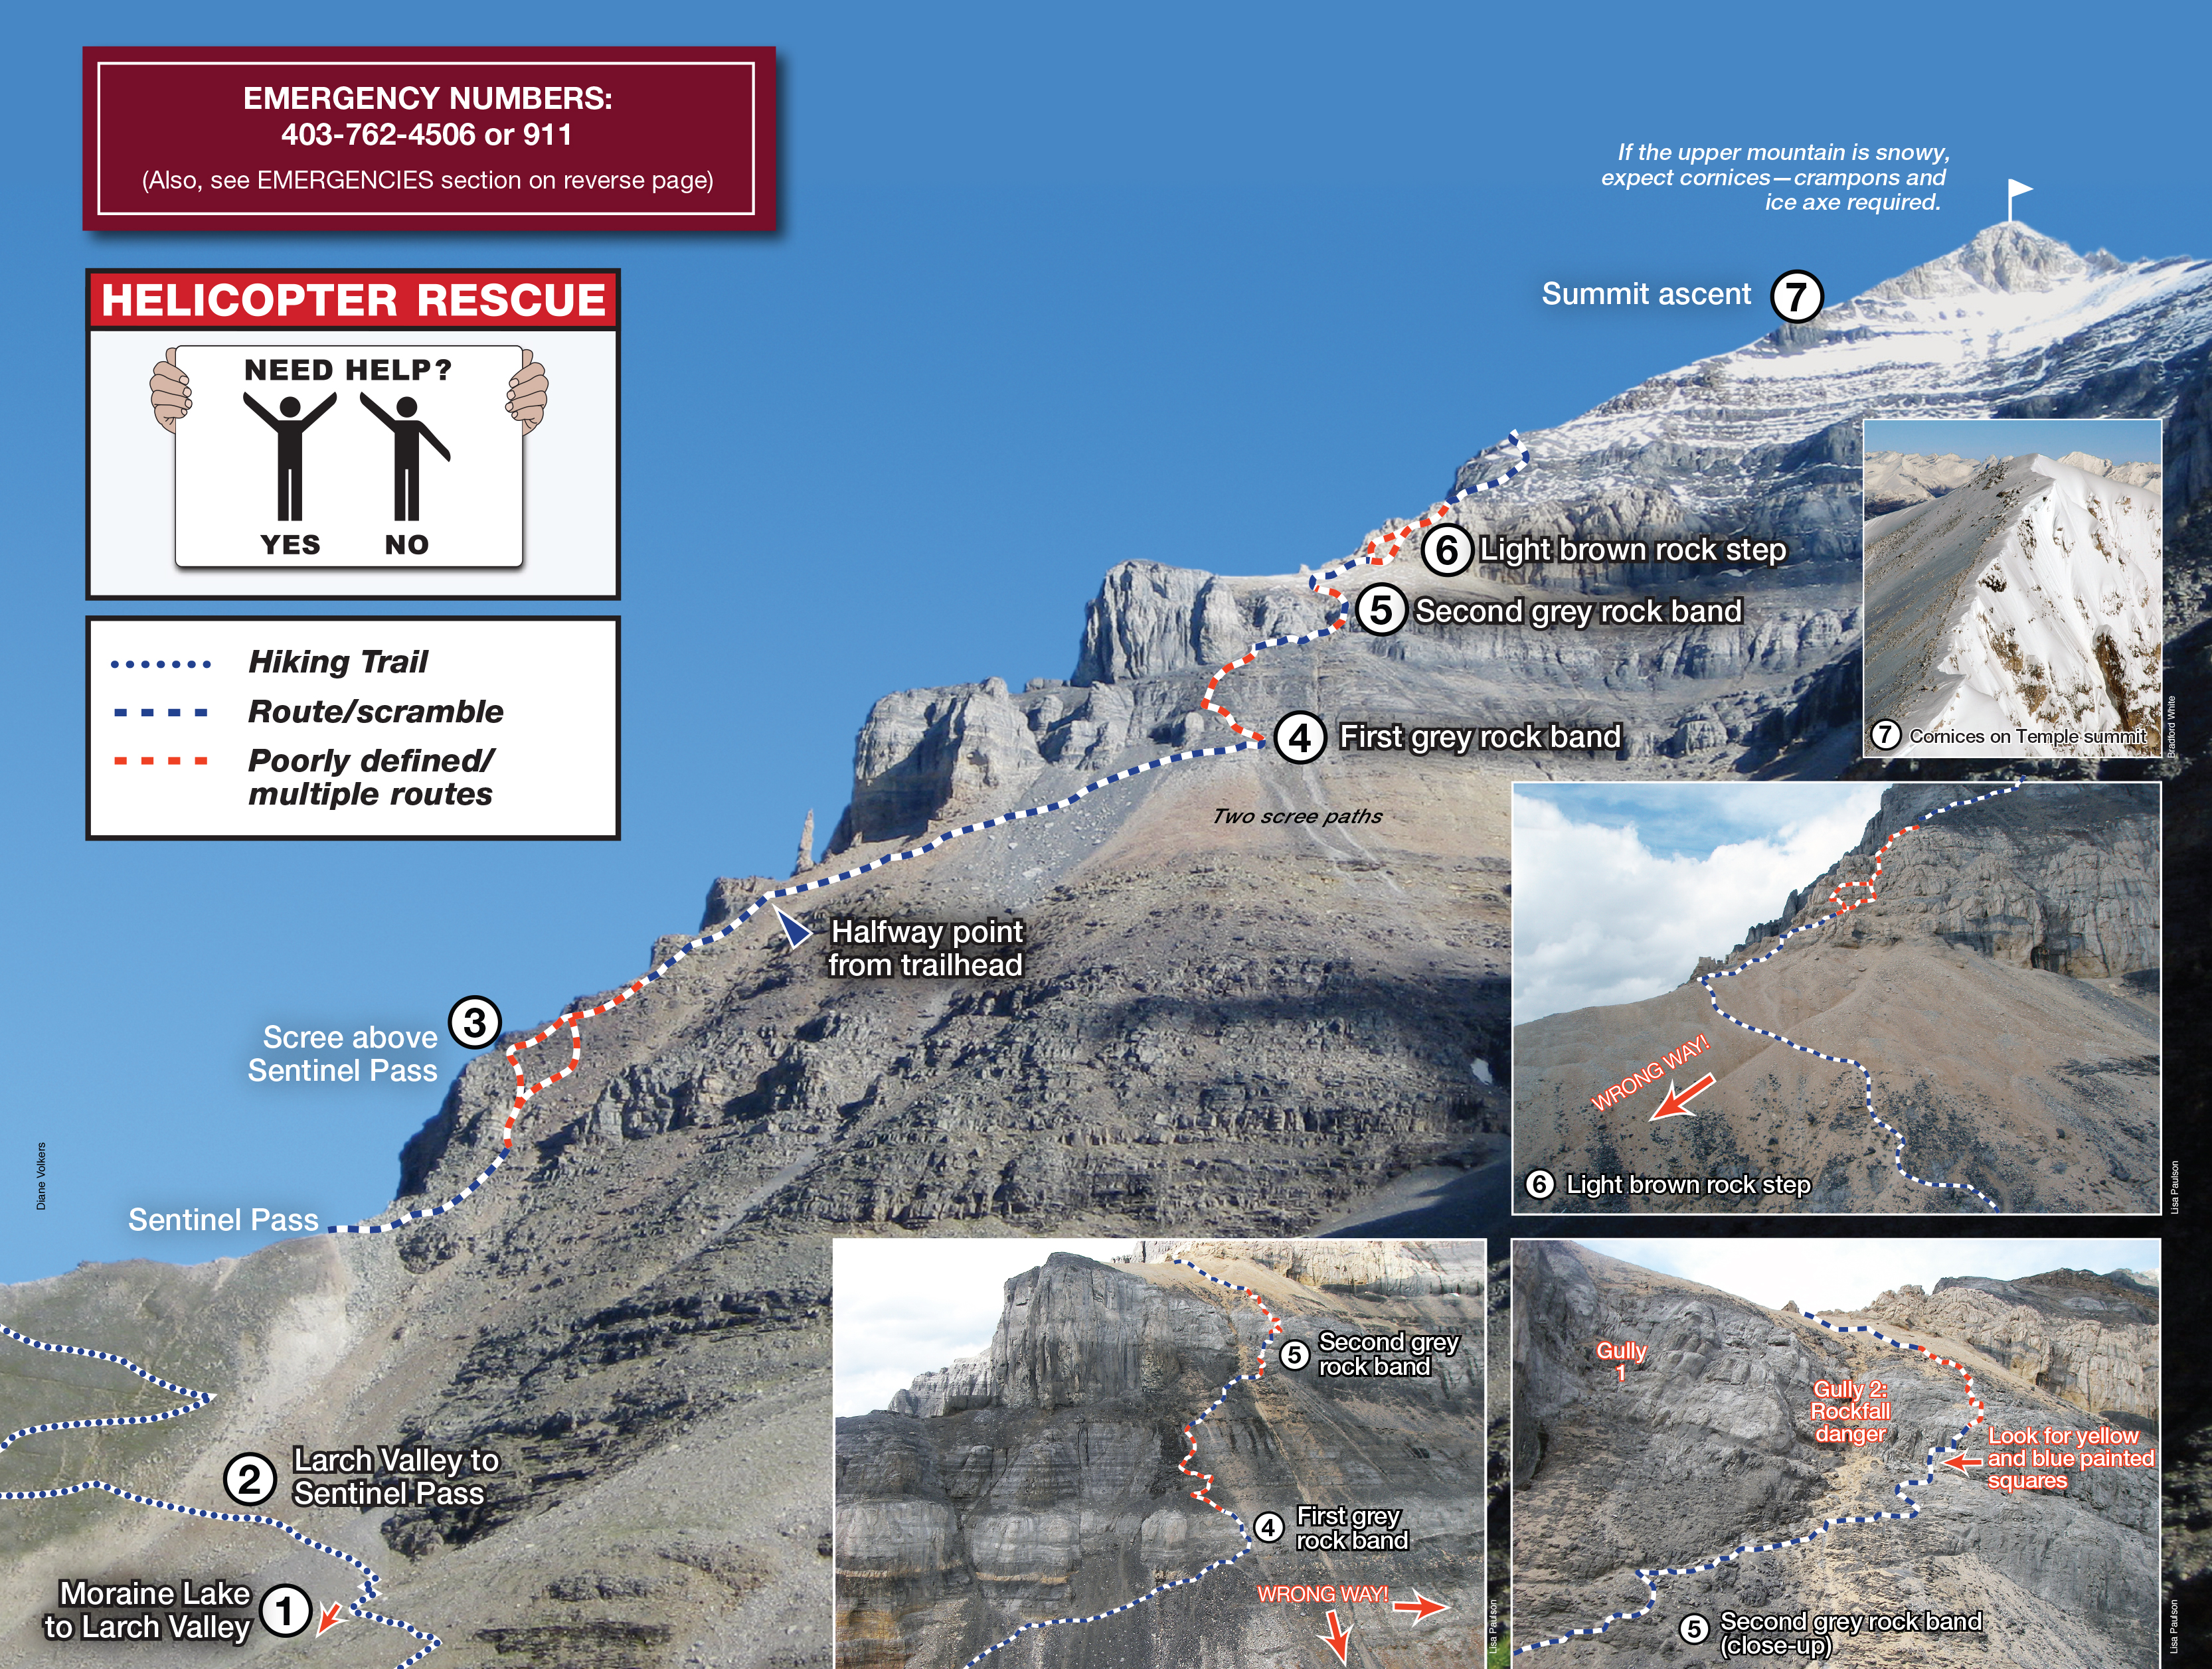
Trail restrictions for the Larch Valley/Sentinel Pass trails are often in place during the summer to protect resident grizzly bears and visitors. When in place, people must hike on these trails in a tight group of four or more. Check with Lake Louise Visitor Centre or call 403-522-1264. The Mount Temple scramble route above Sentinel Pass is not included in this restriction. The trails are busy, but it may be difficult to find others to hike with if you start early at the trailhead or arrive late back at the pass. For your convenience, plan this trip with four people.The route description to the summit of Mount Temple begins at the Moraine Lake parking lot. The following description matches the numbers on the photos below. Round trip time is 7-12 hours.
1. Moraine Lake to Larch Valley
Follow the lakeshore trail, past the Moraine Lodge (1 888 m), for 35 m to the trail junction for Larch Valley/Sentinel Pass. Thirteen gentle switchbacks lead up 352 m through 2.5 km of forest to another trail junction near a bench. Take the right (north) fork towards Larch Valley/Sentinel Pass/ Paradise Valley (the left fork leads to Eiffel Lake).
2. Larch Valley to Sentinel Pass
As Sentinel Pass (2 611 m) comes into view, take time to look at the route and conditions from a distance. If there is any snow on the upper mountain, ice axes and crampons are likely required; this may mean turning around. Ascend the switchbacks to Sentinel Pass between Pinnacle and Mount Temple. This is a good spot to put on helmets.
3. Up the scree from Sentinel Pass (2 611 m)
A worn scree path dotted with cairns leads up and just right of the ridge. To avoid loose scree and rockfall from parties above, stay to the left of the broad gully where the footing is more secure. At the top of the gully, a long diagonal path leads up and to the right, past a yellow rock wall and below two large gullies to the first grey rock band. Two prominent scree paths should be visible below—an important landmark.
4. First grey rock band
Climb the left side of the shallow gully; look for a cairn marking the ascent line. Don’t be lured by the beaten path that leads away on a big traverse to the right, passing the two scree paths below, to where the cliff band becomes more difficult to ascend. Scramble up a series of rock steps. Paths and cairns lead up through the grey/black steps towards the second grey rock band. [Look back] and landmark the correct descent so you are not lured to the wrong feature when you descend.
5. Second grey rock band (considered the crux of the route)
Traverse under two gullies closest to the ridge and climb two steep blocky steps just to the right of the second gully. Both the five-and three-metre steps involve some exposed climbing. Be careful at the start, as there are some polished holds, and consider the security of a rope and solid belay here, especially on the way down. There is a 2 bolt anchor at the top of this section. It’s not recommended to follow the beaten paths up the gully, as they expose climbers to the large bowls above where both natural and human-triggered rockfall may occur. After the step, follow the cairned path zigzagging over the gravel–covered rock slabs/steps (take extra caution here during the descent), then angle left, back to the ridge to find the break in the next band of light brown rock. [Look back] — note the way to the step for the descent.
6. Light brown rock step
Follow the cairned trail to the ridge crest and ascend the rock steps just right of the ridge. Make every attempt to stay to the side of the gully, especially if there are people above. Gentle rock steps lead left out of the light brown rock onto black scree. Follow cairns and switchbacks slightly right through dark rock to regain the ridge. The summit ridge comes into view.
7. The Summit
Follow the switch-backing trail in the scree towards the summit. CAUTION – if snow remains on the upper mountain, expect to have unstable cornices on the ridgeline on the climber’s right. Be sure to stay on the rock well back from the edge. This hazard can be especially difficult to avoid in poor visibility and fresh snow. Also, in early season this ridge can be a mix of snow and ice that requires crampons and an ice axe to negotiate. Check conditions before starting and be prepared to turn back if necessary.
The Descent
Descend by the same route you climbed. Retrace your steps. No shortcuts! Be very careful on the descent not to dislodge rocks, which can injure people below. Other gullies or routes may look inviting (there may even be cairns!) when looking down from above, but any other route will lead to larger cliffs or looser rock.
After descending the last rock band, it may look tempting and even shorter to plunge down one of the two scree paths leading well away from the ridge into the middle of the amphitheater. On a busy day, these routes leave scramblers exposed to rockfall from above. There have been several rescues of people hit by rocks in the lower section of this route.

Related links
- Date modified :